毛绒团队发布短片


 +7

@higgsfield_ai3D 场景
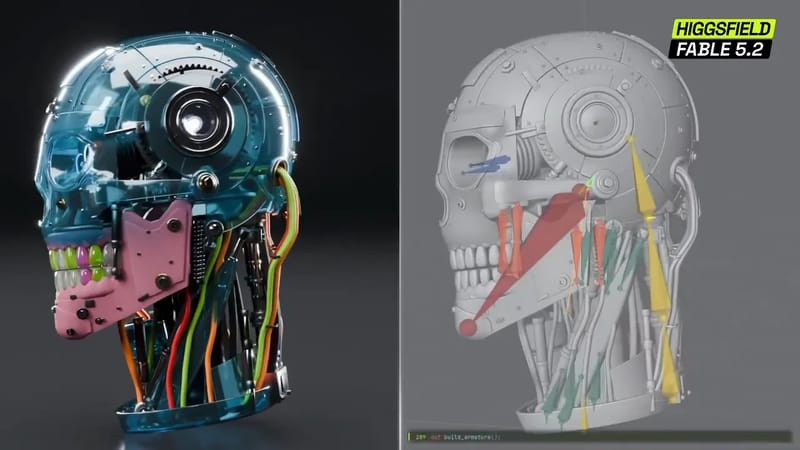
Claude Fable 5.2 built this zombie hand in Blender, gave it a working rig, and animated it crawling, backflipping, and making gestures. Here’s how we built it with Claude and Higgsfield.
Using Blender's Python API (bpy, bmesh, mathutils), build a complete animation pipeline from scratch and get it right on the first pass:

1. Model an original stylized cartoon zombie hand with stylized wounds, stitches and a severed stump at the wrist.
2. Build a production-style rig with custom controllers (IK/FK, gizmo rings, curl sliders).
3. Animate it pose to pose first, then polish the curves (overlapping action, weight, floor contact).
4. Set up rich, tactile cartoon shading, texturing and lighting.
5. Render the final video on a cloud GPU with Higgsfield GPU (the /gpu command).

## 1. Design and modeling

Design an appealing, characterful stylized cartoon zombie hand with a cartoon game look.

1. Silhouette and proportions
   - Expressive cartoon anatomy: a broad, sculpted back of the hand, plump palm pads, slightly oversized knuckles, three clear segments on each finger and a two-segment thumb with a heavy base.
   - Faceted, stylized geometry with clearly readable finger segments and knuckles.
   - Chunky cartoon fingernails, slightly curved, with a triangular chip on one or two of them.
2. Zombie details on the back of the hand and the stump
   - Back of the hand and wrist: clean cartoon zombie details, not gory realism. Add a stylized torn wound on the back of the hand and a cut near the wrist, held shut with 2–3 large metal staples or thick cross-stitches.
   - Severed stump: a stepped cut of purple-magenta flesh with a smooth, cream-white cartoon bone sticking out of the center, ending in a rounded knob.
   - Optionally add one or two small craters or scars, or a loose bandage around the wrist, so the silhouette reads clearly from every angle.
3. Animation-ready topology
   - Put three parallel edge loops on every finger joint and across the knuckles, so the mesh doesn't collapse or break when a finger bends 90°.
   - Use Subdivision Surface with controlled creases and bevels to keep a faceted cartoon feel on smooth forms.

## 2. Rig and custom controllers

Build a full armature with clean weights (Automatic Weights, then a scripted per-segment cleanup for the finger segments, palm and stump) and visible custom controllers (custom_shape).

1. Deform bone hierarchy
   - Root: global movement and in-air rotation for the backflip.
   - Wrist_Stump and Bone_Core: stump bend and twist, plus a small independent jiggle of the bone.
   - Palm_L, Palm_Center, Palm_R: the palm arch (cupping and spreading) when the hand pushes against the floor.
   - Full chains for all five fingers: Metacarpal → Proximal_01 → Intermediate_02 → Distal_03 → Tip.
2. Controls
   - Clean, colored gizmo controllers around the finger joints and the wrist: Circle, Square and Cone meshes that don't render, assigned with pose_bone.custom_shape and colored by group (green, cyan and yellow outlines).
   - An IK/FK switch for every finger and a panel of finger-curl sliders next to the hand.
   - A Floor constraint (or a Z >= 0 check for the fingertips), so the fingers never pass through the floor while crawling or landing.

## 3. Animation: key poses first, then polish

Animate in two passes, the way professional 3D animators work.

### Pass 1: key-pose blocking

Set clear key poses with readable silhouettes and check them on the timeline (30 fps, 20 seconds / 600 frames):

- Block 1 (0:00–0:03, frames 1–90). Wake up and flex. The hand lies still, then twitches like a zombie (a quick double spasm of the pinky and index finger), clenches into a claw-like half-fist and fans its fingers wide.
- Block 2 (0:03–0:05, frames 91–150). Spider arch. The fingertips press into the ground and push the palm and the bone stump high into a springy spider arch.
- Block 3 (0:05–0:10, frames 151–300). Spider crawl. Six to eight full, coordinated steps forward on a slight curve, walking on the fingertips. The fingers move out of sync (index and ring, then middle and pinky, with the thumb steering from the side), the weight shifts, and the palm dips on every step. Planted fingertips never slide, and the stump sways behind with inertia.
- Block 4 (0:10–0:14, frames 301–420). Wind-up and backflip. A deep crouch on bent fingers (anticipation), a powerful push off the fingertips, a full 360° backflip with the fingers tucked, the palm opening just before touchdown, then a springy landing that settles (squash and settle).
- Block 5 (0:14–0:20, frames 421–600). Gesture combo.
  - The hand rises onto its wrist, snaps into a fist and fires a finger gun: the index finger shoots forward and the thumb cocks up like a hammer, two shots with recoil.
  - It opens into a wide fan and rolls on its long axis, showing the wounds and staples on the back and clean deformation on both sides.
  - It finishes on a neat OK sign (thumb and index finger form a ring, the other three fingers fan upward) and holds with a subtle breathing motion.

### Pass 2: curve polish (Graph Editor, F-curves)

After the key poses, run a script over every F-curve:

- Convert the keys to smooth AUTO_CLAMPED / BEZIER curves.
- Add overlapping action and follow-through of 2–4 frames on the fingertips (the distal segments finish bending slightly after the proximal ones) and on the stump with its bone.
- Add a slight tremor while the fingers carry weight, and a small overshoot on the fast gestures (the finger gun and the OK sign).
- Run a strict check that no finger goes through the floor.

## 4. Shading, lighting and output

1. Materials (Cycles or EEVEE Next)
   - Zombie skin: a saturated cartoon rotten-green base (#5E8C42 blending into #3D5E2A) with soft subsurface scattering (a yellow-green radius), so the fingers glow when backlit.
   - Knuckles, joints and creases: procedural darkening with a sickly plum tint (#4A2C56) in the knuckle creases, around the wounds and under the nails (Geometry → Pointiness or Ambient Occlusion, plus vertex colors or procedural masks).
   - Wounds, stump and bone: moist purple-crimson flesh in the cuts and on the stump (Roughness = 0.25), a matte cream-white bone (#E6DEC8), and metal staples with a bright highlight (Metallic = 0.9, Roughness = 0.2).
   - Nails: grimy yellowish semi-gloss keratin with a dark edge at the cuticle.
2. Lighting and set
   - A dark slate floor with a fine matte stone texture and crisp contact shadows under every finger.
   - Three-point lighting: a strong cool teal rim light from above and behind (to outline the fingers, staples and wounds), a soft warm key light at 45° and a gentle fill.
3. Output: rig and render in one video (20 seconds)
   - Show both the rig at work, in two synced Blender viewports (an isometric view and a side view on a dark background, with the controllers visible), and the final cinematic Cycles render.
   - For example: the render on one side and the two rig viewports on the other, switching to a full-screen render for the backflip and the final pose.
   - Deliver 1080×1920 (vertical) or 1920×1080 (horizontal).

The final render needs to be 1920×1080, horizontal.

## 5. Self-check and final render on Higgsfield GPU

1. Check the key poses locally
   - Before rendering the whole animation, render 6 check frames locally: (1) the back of the hand with the wounds and the bone, (2) the spider arch, (3) a crawl step, (4) the backflip in mid-air, (5) the finger gun, (6) the OK sign with the rig controllers visible.
   - Review every frame yourself: no finger twisted at an unnatural angle, no torn mesh, wounds and staples sitting tight on the skin, and a zombie shader that looks rich and stylized.
2. Final render on Higgsfield GPU
   - Use the /gpu command from the Higgsfield MCP. List the GPUs and their prices, and check that nothing of mine is already running.
   - Quote the render job, upload the .blend file to it, then show me the GPU, the expected credits and the most it can cost. Start only after my yes.
   - Render the full animation in Cycles at high quality with GPU denoising (OptiX or OIDN). Export the final .mp4 (H.264, -crf 15) and download the video and the .blend file.
   - Follow the job until it ends. Don't give up on errors or timeouts: keep going until there's a finished video file.
 3D 场景新0:39
 3D 场景新1:23
 3D 场景新0:25
 3D 场景新0:53
 3D 场景新0:17
 3D 场景新0:30